THIS POST IS FROM ROOM REMIX - THE BLOG .If you've been following this blog from the beginning, you may remember (or not) that a
long time ago I talked about a request that I received for some decorating advice from a mom (Penny) whose 9 (now 10!)-year-old daughter (Lindsey), was moving from a shared room with her sister into her own room.
The only space available was this small basement office. In addition to making it look like a girls room instead of an office, they needed to incorporate an already existing queen-size bed, a desk, extra storage, and a reading chair. They also wanted to do it all on a small budget.

After I gave her my suggestions, Penny worked on the room as she had time and it's actually been done for a while, but we just hadn't been able to connect to get photos.
Funny thing. The reason for waiting until I could take photos instead of her snapping a few and e-mailing them to me was that I had the better camera. Ha! As you can see in this post, better camera does not equate to perfect images. The day we had scheduled was cloudy/rainy and it definitely shows in the photos (as well as my inexperience behind the camera). I did learn some things like: 1) don't take interior photos on a cloudy day 2) don't decide to use the manual settings on your camera to compensate for the dark room, if you really have no clue what you're doing; 3) Adding an extra (glaring) lamp behind you to make it lighter only results in major shadows: 4) Cranking up the ISO really does result in lower quality, grainy photos! On the bright side? lessons learned. I just wish I had been able to capture Lindsey's room in it's best light (literally!).
_______________________________________________
Anywho. Lindsey had already chosen the Roxy bedding shown in the partial mood board below and wanted to use it as the starting point for the room. (They purchased it at Bed, Bath and Beyond, but it looks like it may no longer be available there.)

The first item on the agenda was to paint the walls. I recommended Sherwin Williams 6710 Melange Green, which is a slightly darker version of the green that is in the bedding.
Headboard- Since the only position for the bed was up against the window and the headboard was too high, she modified the existing pine footboard, painted it white and use it as the headboard. Works much better!

Brown Dish Chair - They had purchased this at Walmart and it was an absolute must on Lindsey's list for the room. With the space being so small we had to get creative with furniture placement, so it went in place of a night stand on the left side of the bed. Functionally, it actually works pretty well considering there is a light overhead for reading and it's in perfect position to prop her feet up on the bed if she wants.
Accent Pillows - To mix things up a bit I suggested foregoing the "bed-in-the-bag" pillows and using other accent pillows. They are from Walmart(circle) and Target(bird).
White Night Stand - Stanley night stand she found on Craig's List for $35!
Pendant Lights - from IKEA. Love them!
Curtains/valance - from Bed Bath and Beyond

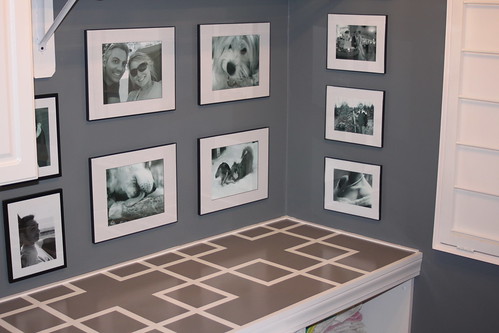
I saw this bird art at Target and the colors were perfect for the room, so I picked it up. I knew that it was too small for the wall, but thought it could be incorporated into a larger grouping. The cute grouping below is what Penny came up with. She found the frames on clearance at Target and just painted them blue. Not sure where she got the polka dot ribbon.
When I arrived to take pictures, the desk area looked like it still needed a little something so we quickly whipped up this DIY art. We took peel and stick mirrors that Penny had, added them to these inexpensive plates from Target and hung them on the wall! Because we wanted pink to be the least dominant color, we used a larger mirror on that plate. For some reason the shadows in this image make them look a little wonky, but they're not IRL. For the finishing pop of color and interest we glued green ric-rac to ribbon left over from her other art project and attached it to the desk with double-sided tape. Kylie Desk and chair - from Walmart.

This mirror is from HomeGoods. It was bronze in color, so she taped off all of the circles (yikes!) and spray painted it white. The colorful little storage box is actually a gift box that Lindsey received a gift in. Penny thought it went well in the room, so she used it. Love that! And, of course, Lindsey's favorite soccer bear had to be included in the accessories. The polka dot photo album is from Target. (for the observant who notice the brown clock in the mirror, yes, I swapped it out with the white clock after taking this photo)

Penny mentioned that she's feeling like she may still add something to the space under the pendant lights but, other than that, the room is done and I think she really did a great job, especially on a small budget! Giving the advice was the easy part. Icing on the cake? Lindsey's loving it.
Linking to:


