Monday, November 30, 2009

Simple, Inexpensive "Window Treatment"

I really won't be doing a Christmas post every day this month, so for those of you who aren't looking for Christmas ideas, hang in there! :-)


I was at the Dollar Store before Thanksgiving and saw these big white styrofoam snowflakes for $1 each. The front of them actually has a felt texture with a tish bit of glitter. I liked them, so I bought some without actually knowing what I was going to do with them.

After thinking about it, I decided to take down the window treatment in my master bath (just for the holidays) and make a "christmas valance". I already had the little gold ornaments and, as you can see in the photo below, the back was just the right size to stick into the holes in the snowflake - no glue needed!


There was already a little white ribbon attached to each snowflake, so I just used that to attach them to the curtain rod. To soften it a bit, I added a length of wide ribbon that I already had in one of my Christmas boxes. That was it. $5 worth of snowflakes and ornaments/ribbon that I already had...

I'll be editing to link to blog parties as they happen:
DIY Day at ASPTL
Get Your Craft On! at Today's Creative Blog
Trash To Treasure at Reinvented
Transformation Thursday at Shabby Chic Cottage
Thrify Thursday at Tales From Bloggeritaville

Have an awesome day!

Sunday, November 29, 2009

Tabletop Christmas Trees


Hi there! I hope you all had a great holiday weekend! We had a very busy, but very enjoyable Thanksgiving and weekend. The last of my out-of-town guests just left about an hour ago, so I'm quite honestly just not quite back into my blogging groove yet.

My niece and I were talking about tabletop trees last night. Since it was on my mind, I thought I would do a quick post with some unique tabletop tree ideas to ease back into my blogging week. These are just some of the ideas available from BHG.com. More ideas are available on their site.

These trees were made by rolling paper into conical shapes, trimming the bottom and gluing a bead to the top.

I LOVE this idea below. Simple and unique, and think how much the look could change depending on the wrapping paper/ribbon/cake stand you chose. You could also make it taller, and finish it off with some sort of tree topper. Also make it with or without ribbon (although I really like the ribbon!)

Topiary forms and tinsel garland...
REALLY liking these topiaries...

How 'bout a button tree?

I also wanted to thank This Mama Rocks for featuring me as blog of the week, and Annie from A View On Design for the Lovely Blog Award. Thank you so much ladies!

Thursday, November 26, 2009

Christmas Decorating Inspiration and Ideas

BHG.com

Since there are probably many of you shopping and decorating for Christmas this weekend, I thought I would preschedule this post in case you're looking for some inspiration for your Christmas decorating or gift wrapping. Enjoy and have a good weekend!

Just one of the ideas from BHG.com's
Decorate Your Staircase for Christmas


Crafts for a Beautiful Christmas Mantel at BHG.com


12 Different Printable Gift Tags from myhomeideas.com


I know it's probably in the "less economical" category, but I love these ideas for using more than one bow from Good Housekeeping. Maybe if you used inexpensive bows (Dollar Store)? :-)
Photo Andrew McCaul Styling Megan Hedgpeth

Unique Holiday Gift Wrap Ideas from Good Housekeeping
Photo Andrew McCaul


Memorable Gift Wrap Ideas from myhomeideas.com
Photo Tom Leighton

Fairly certain everyone has seen the Eddie Ross wreath by now, but just in case you haven't - the tutorial is HERE.


Easy Make Holiday Wreaths from Good Housekeeping.
Photo Frances Janisch


Remember the ornament cluster idea? I found this one at Southern Living with just a little different spin. They've used string rather than florist wire and attached it to an ornament hanger. Also used more/smaller ornaments for a little different look.
Southern Living Photo Monica Buck

Wednesday, November 25, 2009

Inspiration and a Winner!

Country Living Photo Tria Giovan

Kind of a random variety of things here today...

Wow... over 500 followers. I'm in shock! Thank you so much for following and subscribing! I also enjoyed getting to know you a little better through all of the comments that you left about your Thanksgiving plans. For those of you who left such kind comments about the blog - you made my week!

The winner of the Amazon gift card is #4 - Happy Nester! Congratulations! Please e-mail your address so that I can get the gift card out to you.

I love to see people actually using the ideas that we talk about in posts, so I thought I would share photos from a couple of readers...

Janell from Isabella and Max Rooms saw the clustered ornament post and used it for the ornaments on her railing. So pretty, and I'm slightly jealous of her color scheme, I must admit! :-)
Remember this DIY Headboard idea post? Jess from The Adventures of Rory and Jess saw it and decided to make it. Didn't she do a great job? Now she's on the hunt for new bedding, so that will be fun to see as well.

Last, but certainly not least, HAPPY THANKSGIVING TO ALL OF YOU! Hope you have a wonderful, blessed time wherever you may be. My guests arrive today and will be here through the weekend. I'm going to try to get at least one more post pre-scheduled to come up prior to Monday, but if not I'll definitely see you back here on Monday!

Tuesday, November 24, 2009

Christmas Card Holder


I had the wrought iron piece shown below left over from this project (which will be getting another remix at some point coming up - just don't tell my husband :-)) . It's been hanging out in the garage, and as I started to think about decorating for Christmas the idea hit me (not hard, so I'm okay :-)) that it could be used as a Christmas card holder. I decided to put it on the interior front door to spruce it up a bit. The door is visible from most of the main living area so we'll be able to enjoy the cards, which is the point. So...

BEFORE

We (he) used a side grinder (a tool which I had never heard of prior to this) to grind off the tabs which had previously been used to attach it to the folding screen. Once that was done, I painted it with some gold spray paint, looped some ribbon through the top to attach it to the door and made a little bow and greenery to add a little something at the top. I'm actually not thrilled with that part and may end up doing something else there, but for now... I rummaged through last year's Christmas cards and attached some so that you could get the idea. Since I'm going to have to take them off and put this year's on I was too lazy to put a ton on :-) I punched a hole through the corner of each card and attached it to the holder with ribbon.


I used little disc magnets on the back of the holder to snug it to the door so that it wouldn't bang around every time we opened and closed the door. That's why I used ribbon to attach the cards - any type of clips I tried pushed the iron away from the door and the magnets gave way.

That's it! Hope you're all having a good day...

The $35 Amazon Gift Card Giveaway ends today at midnight!

I'm participating in the following blog parties (buttons are on my sidebar):

DIY Day at ASPTL
Get Your Craft On at Today's Creative Blog

Monday, November 23, 2009

Accessorizing Your Walls - Solving The Small Art Issue

Pottery Barn

So if your art is too small, you really love it and don't want to change it, what do you do? Well... you could use some of these tricks to make it feel larger than it really is. Give it presence, for lack of a better word. As with all of the ideas I present on this blog, I would encourage you to think past the exact replication of what's in the photo or the style, if it's not yours, and think about how you could modify the IDEA to suit your own decor.

Add molding. See how much more dramatic of a focal point this mirror becomes just by adding the simple molding around it?

house and home

We've talked about the color block idea, and as you know, I'm a fan for a variety of reasons. I'm not going to repeat this entire post (there are two more examples here and here), but two of the reasons are - it's an inexpensive way to make a big statement and there are a bajillion variations on the theme - limited only by your imagination.

Thrifty Decor Chick used the color block idea combined with molding above her sofa. Picture this as well with the color block and only the outer molding with a picture and two sconces centered in it OR three vertical pieces of art OR plates OR three vertical color blocks framed with molding OR... the list goes on.

Diyideas.com has this clever "constant canvas" for rotating children's art. This fabric covered plywood idea could be used for any type of art and could obviously be enlarged if you have a larger space to fill. Go to their site to see how they do it and how they also add dimension with brackets.

DIYideas.com

Very simple idea below that, again, could be modified to suit your needs. The larger one or both could just be paint or wallpaper too, wouldn't have to be covered canvas. You could also add a third dimension by hanging something on the smaller canvas (art, sconces, mirror, etc.)

BHG.com Photo Greg Scheidemann

Love how this little chest below actually becomes part of the art with the addition of this fabric trimmed with molding. Again, think of the possibilities to suit your space and decorating style.

House and Home Photo Angus McRitchie

Could you imitate this idea below and just hang a larger frame over your existing art?

DIYideas.com

Variation on the idea above. Could you hang your art over a larger mirror? I just put this together in Power Point, but you get the idea.

Mirror - Pottery Barn Art - Ballard Design


Donna from Funky Junk Interiors wasn't trying to make this clock appear bigger, she wanted to hide the cord :-) (and it worked!), but this is a great example of adding some sort of structure behind your art to make it larger. This idea could work for any style from country to modern, depending on the items that you use.

Funky Junk Interiors

Think of ways that you could modify these ideas to suit your own decor. Let me know what you come up with! I would love to see it!

Don't forget to enter the $35 Amazon Gift Card GIVEAWAY!

Sunday, November 22, 2009

A Quick Ornament Tip

This may be really old news to all of you, but I'm hoping someone hasn't heard of it and can use it as an idea to shake up your current ornament collection a little bit. I was "window shopping" Christmas trees about 3 years ago and someone shared this idea with me. I've been using it since and love it.

Take a length of green florist wire, string 3 ornaments on it and then twist the remainder of the wire to use as a hanger to hook them on the tree. You end up with a pretty ornament cluster like the example I made above. Use your imagination and mix up colors, sizes, etc. for a variety of looks.

Hope you're having a good weekend!

Linking to the following blog parties:
The DIY Show Off


Don't forget to enter the $35 Amazon Gift Card GIVEAWAY!

Saturday, November 21, 2009

Faux Granite Vinyl Countertop (???)


Has anyone heard of or used this faux granite wallpaper product on a counter? I heard a designer talking about it on a DIY segment on one of the national morning shows last week (can't remember which one) as a good temporary solution for changing countertops.

NOT promoting it, have absolutely NO clue about it, just wondering... I've seen people painting their countertops and wondering if this might be a temporary solution as well. (coincidentally DIY Showoff is showing off Rocky Bellas painted countertop today if you want to check it out)
_______________________________________

Also, not that it's Roeshel - DIY Showoff day or anything, but I really want her to win the True Value DIY Drama contest so that she can make over her master bathroom (just think - more before and after photos! :-)), so click on over to see the video and place your vote. You can vote once a day.


Don't forget to enter the $35 Amazon Gift Card GIVEAWAY!

Friday, November 20, 2009

Accessorizing Your Walls - DIY Art Ideas

Well, yesterday you learned that I have a short attention span, and today you're learning that I just can't be relied upon! I said that my next post would be ways to make small art bigger (which WILL happen) and instead I'm showcasing some DIY art inspiration. What I'm learning - don't broadcast what you're doing in advance, just do it when you do it and then you won't feel the need to apologize! :-) Honestly? I took the day "off" today to get a bunch of baking and some other things done for the out of town company I'm expecting for 4 days next week and this post just went together more quickly than the other ones.

Click on the sources for more information on the project.

Wallpaper Art

Southern Living Photo Laurey W. Glenn

Word Art

Myst33 via DIY Showoff


Frosted Monogram Mirror

The DIY Showoff

Magnetic Chalkboard Mirror

Viva Full House via Design Sponge


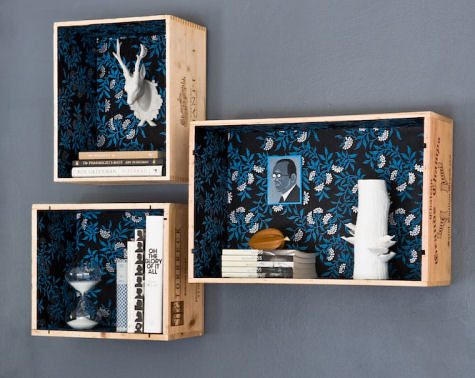
Wine Crate Display Cases

via Design Sponge

Gold Chevron Paintings

Make Under My Life


$60 Pottery Barn Knock-off Mirror

Starter Home To Dream Home

This design was made using a rubber doormat!

Frugal Home Ideas

Ceiling Medallion Art

BHG.com

Don't forget to enter the $35 Amazon Gift Card GIVEAWAY! Have an awesome day!

Thursday, November 19, 2009

GIVEAWAY!


You may not already know this about me, but I get bored easily, so it's been REALLY hard for me to stick with this Accessorizing Your Walls "series". :-) So... I've made an executive decision to interrupt the series with this giveaway rather than waiting until it was done (but still relate it to the series more or less).

One lucky-duck Room Remix reader has a chance to win a $35 gift certificate to Amazon.com! You can spend it on whatever you want, but they do have a lot of great design books that can help you with your questions on accessorizing your walls too (see how nicely I tied that all in?)

I REALLY appreciate all of you who follow and subscribe to this blog, so this one's for you. In order to enter you MUST be a follower or subscriber (it's just so encouraging to see those little follower faces on my sidebar :-))

To enter:

1. Leave a comment telling me you're a follower or subscriber and tell me one thing about your Thanksgiving plans.

2. Extra Entry - Blog about this and leave ANOTHER comment telling me you've done so.

There aren't many posts left in the series (one? two?...) but we'll continue in the next post. Here is today's Accessorizing Your Walls - Bringing It Together post in case you haven't read it yet.

Giveaway ends at midnight CST on Tuesday, November 24th. Best of luck!
THIS GIVEAWAY IS CLOSED.